Welcome to my new Blog


Welcome to my Blog.
My Blog is mostly about my hobbies, ie Model boats, Cross Stitch, Gardening, Days out and about, Lego Technics and Photography you might recognize the hat rather than me. My models and other hobbies can be found in the Tabs at the top below the header picture.
There will also be entries of days out with my camera, weather permitting of course.

Friday, 24 September 2010

Windows cut out

Yesterday started to cut out the windows and as a band saw will not cut out holes my mate Bob couldn't help out so it was down to the old fashioned fret saw and craft knife. I remember my father years ago using a fret saw to make pipe racks and such to hang on the wall, The house was full of the stuff ! never thought it would come back to haunt me but there you go, like fashion clothes it all goes full circle.

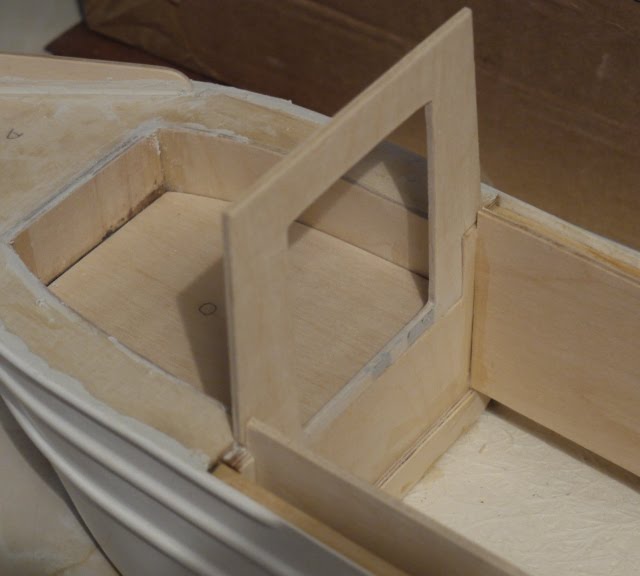
The first side went quite well and as you can see pretty neat,with the cross bars fitted as well.
And just in case there is anyone out there who as made this model I know that's the wrong side for the front of the boat, its only put there to photograph


I thought I might do a bit of a change from here on and put an insert in the inside of the windows to make them a smoother finish , so out with the plasticard and cut strips just proud of the thickness of the side piece and then sanded down to same thickness

I then decided to make a template of the outer frame and cut all the frames the same size so that they all match 

So far so good will make it a lot easier if it all works out, and all the window frames will be the same size.
Frame to be cut out with template which is the right size as markings on window and then stuck to front of inner lining with Plastic Weld and when dry cut out the openings from the back and finish up to inner lining, clear as mud hey ! it should all come clear in the next blog, The other side frame to cut out yet as well.


Wednesday, 22 September 2010

Back to the stand !

We had a day at the lake again yesterday, well you have to do if its sunny don't you , those dark winter days are waiting in the wings ready to chill us oldies to the bone.
After dinner I decided to have another look at the stand for the boat ,if you look back at an earlier blog you will see it was quite tall and I decided that you saw that before the boat,so I cut off 2" all round and I think it looks more in scale to the boat

Here is the finished article, Harlequin and canal art all fitted back and ready for a coat of satin varnish spray.
Also the foam strips fitted ( a mouse mat cut into strips and glued on with Evostick )

With the boat sat in I think you will see the cabin better now without the stand in the way,


Looking at the last couple of pictures gives you an idea of the way the coaming projects up to take the cabin section on, and the nice clean workshop I have !! Believe me its not worth the hassle to not keep it this way .

Tuesday, 21 September 2010

Chihuahua vs Great Dane


Just thought you would like to see this if you like dogs as much as we do !.

Monday, 20 September 2010

Side decks finished

Yesterday finished filling in the gaps between the side decks and the hull , such a good way of the kit plans doing it not much filling to do (and my cutting of course), and no freeing ports like my last few builds, that's a bonus !.
Then finished the rear deck hatch , the two pieces stuck together and the hole for the tiller drilled


Finished the Bow sprite , all fillered and sanded down.


Thought a bit of chequer plate plasticard would look good in the front well so did that to see if it would look right on the boat and thought it was alright so will put some on the rear deck as well when I get round to it.


So now its on to the superstructure , that will slow me down as there are all the windows to cut out and my mate Bob can't help with his Band Saw has they don't cut out holes !! so it will be a bit of sharp craft knife and fret saw job.

Sunday, 19 September 2010

Day at the lake


Yesterday went to the lake and during a very heavy down pour we had lunch at The George and then as it started to clear up, watched the friendly bowls competition start, then we went back to the lake and got the boats out, no one else there !.


We made a few kids happy giving them turns each of the small club boat we have taken over from John Davies and lets face it they are the club members of to-morrow and some of us aren't getting any younger.
Took Pepe a walk  round the big  lake whilst Velda sailed her tug ,so it all turned out alright in the end , but its starting to go cool about 4-0 o'clock now , so it was time to pack up, a coffee in the Cafe and then home again after a good day out

Saturday, 18 September 2010

More on the hull

Some more on the hull section of the boat
Side pieces were fixed in and then the inside walls were fitted

Now you can see where the cut outs in the formers come in.
The inside walls are higher than the deck to form the coaming

This gives you an idea of the slotting on of the superstructure ( front door section)


Whilst these were drying fitted the servo to Rudder arms,the squared end on the rudder is for fixing the large tiller arm they have on Narrow Boats

Then it was on to the side decks that fitted between the inner deck and the hull 


Now only have to filler between the hull and the deck but as you can see not a big job 
Went to the lake yesterday so not much modelling done, tired out after walking the little beastie round the lakes,thought a small dog now we are getting older but that didn't work out quite as we planned !

Tuesday, 14 September 2010

Rear Deck fitted

Yesterday, bad weather so it was more modelling.
Rear deck plate with beads in to support the hatch covers
Fitted the rear deck and it went in a lot easier than the front one has it didn't have the angled sides of the front one.
Then it was the turn of the rest of the 8 formers, just a matter of dividing the space between No1 and No8 and then epoxying them in 
Whilst this lot was drying I cut out the rear hatch covers ready to be fitted 

I'm finding that the worries I had at first about the plans not being to scale were unfounded as the instructions and plans together have been very good and someone with very limited modelling skills would find it no problem as a first time kit.
I hope to add a few extras as I progress, we will see !! 
I suppose its not impossible to fit a working top with a cassette dropped in with a commercial load instead of furniture at a later date as I did for my 10 hatch coaster with its different decks, don't know how I do it for the  money !.

These pictures were taken at St Anne's Boaters lake in 2006 and been in the back of my mind all this time, so must have made an impression, nice aren't they!.